Pages

Showing posts with label battery. Show all posts

Wednesday, November 2, 2016

Foamy Rehab 2

Part II

At this point, the carbon rod spar was glued back in place on the opposite side of where it was originally as this surface was clean and flat.  Instead of the brittle epoxy, I opted for Foam Tac which will be more flexible on top of being easier to use.
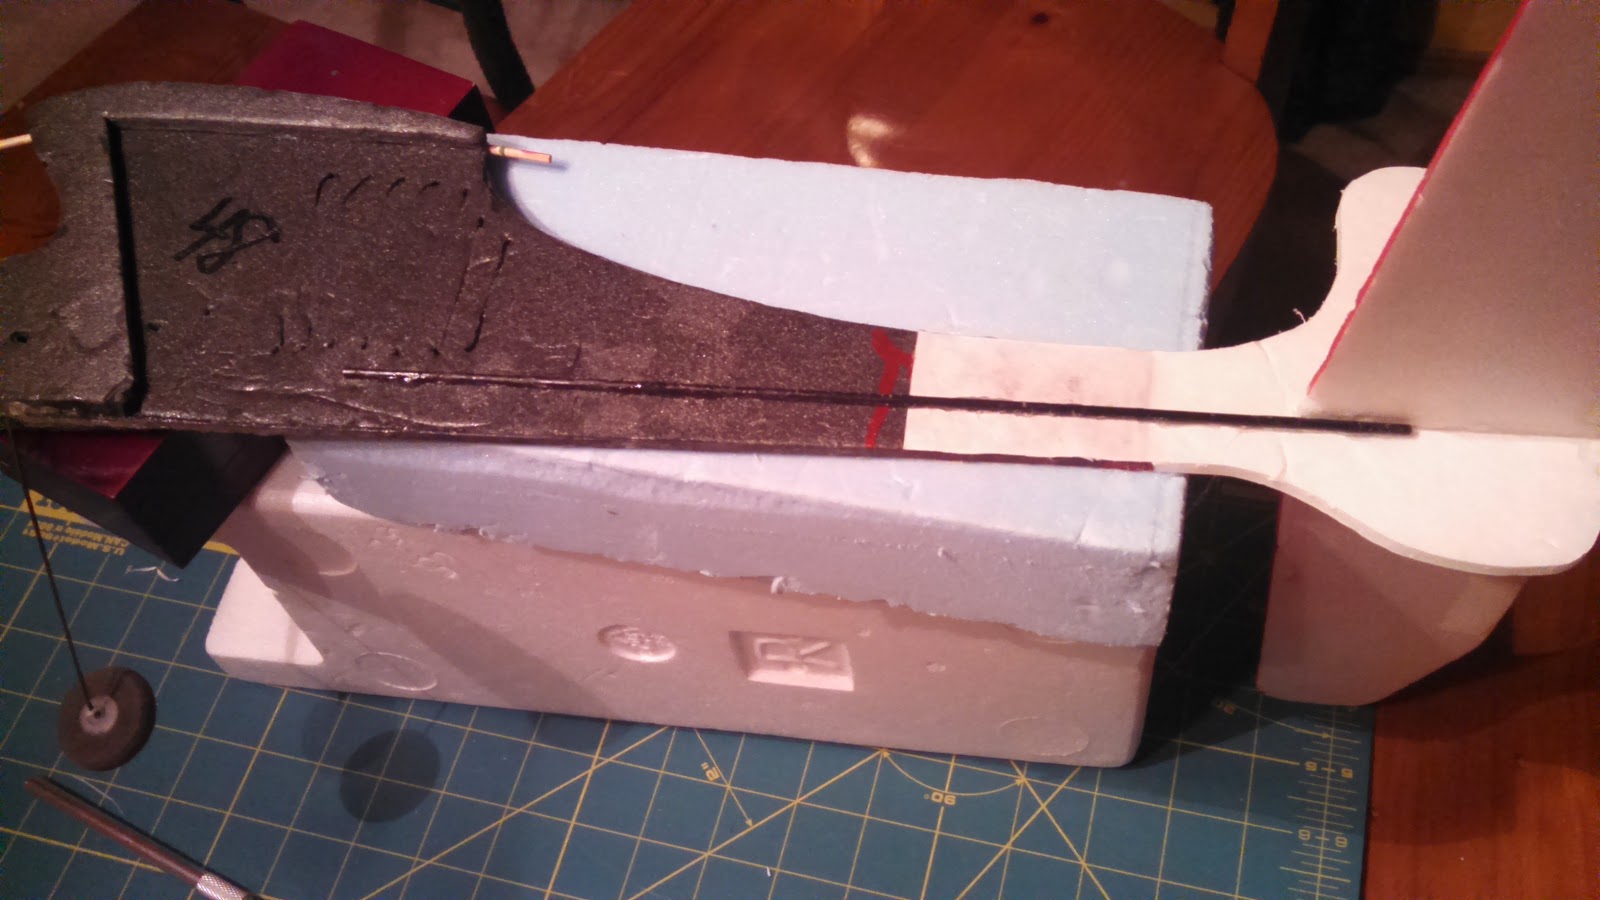
With the adding back of the carbon fiber spar, the frame reconstruction of this little plane is complete.

Now on to the control surfaces and electronics.

On the left in the photo below are the old servos that came with it.  They were a weird mix and I did not want to rely on them.  I happen to have two new 4g servos on hand and decided to swap them out.


Here is a photo showing the ESC and old servos again.  Note the micro connectors.


This photo shows the size difference in the connectors.  They are much smaller but I was not going to be able to use the 72MHz mircro receiver that came with it (I sold this receiver along with another on Ebay for about $20!).


Here is the new 4 channel receiver that I will be using with the two new micro servos installed.  The old ESC still has the micro connector.  I'll have to replace this connector as I don't want to replace this ESC as it already has all of the other connectors soldered on and I would have to get these as well.

OK, on to the tail surface repairs that I decided to make as well as changes to the control horn installs.

There were some dings in the leading edge of the stabilizer that I fixed by applying Gorilla glue and then covering with masking tape.  I let the glue foam up and then trimmed and sanded to shape.


I removed the elevator so that I could redo the hinge tape (pretty much rotted apart) and install a new control horn.  You can see here that the rudder just uses the paper on one side of the foam board for the hinge.

Here I'm cutting pieces from a plastic card to make the parts I need.  I kind of played with the shapes until I was satisfied.

I used this method (Ed from Experimental Airlines, thanks) where it glues on one side and penetrates to the other.  This makes for a light but solid horn.  I cant remember if I used hot glue or Foam Tac for this, but either should work well.  For the hinge on this piece I just use Scotch tape!  Works just fine for this little guy.


Here I did the same for the rudder making sure that at least one of the holes lined up with the hinge point.  You can see that it had to sweep forward to achieve this while not interfering with the cut out on the other side.


I did not want to just glue the servos to the side like had previously been done so I cut some strip of the plastic card and slid them through some slots in the fuse.  These were glued in with hot glue and provided perches for the servo tabs.  The servo tabs were then hot glued to these.  The photos below show both sides.


The push rods extend a long way and the old ones flexed a lot so I attached wires to the ends of some bamboo skewers to make fairly rigid replacements.


Here they are attached to both servos and control surfaces.  I used "Z" bends and mini "E/Z" connectors.  This made it much easier to make adjustments.
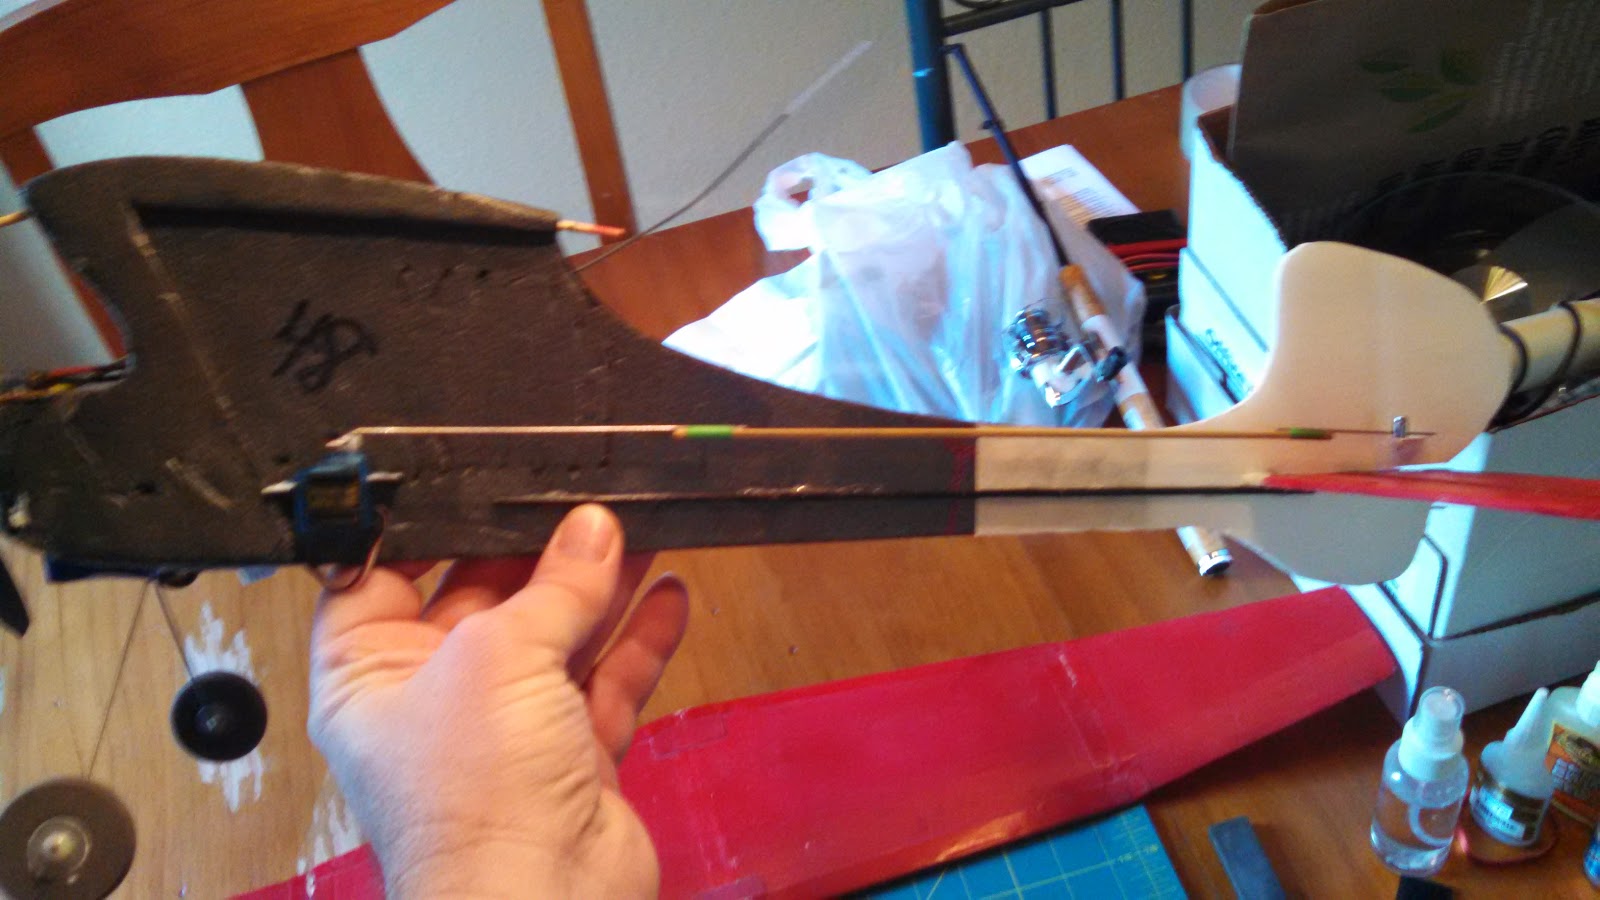


Here is a photo with all of the other electronics stuck on.  I used velcro for the receiver, ESC, and battery.  The battery is way forward so as to get the CG close.  It's still a little tail heavy.  As for the CG, I just kind of guessed assuming that it should be between 25 and 30% back from the leading edge.


This is what it look like with the wing balanced on.  I did not have a rubber band available, but this is what it looks like.


It's all ready to go now.  Just need a nice day and the battery charged.

I have since flown this little thing and I have to say that it is a real kick in the pants to fly.  Looks like it would be too light for any wind but surprisingly enough it handles the wind quite well.  I actually love taking this thing out and flying it when others won't because it's too windy.  One caveat is that it flies well once you get it nosed into the wind!  Otherwise your fighting to keep it from tumbling.  But hey, isn't that part of the fun!

Anyway, I hope this has inspired you to have fun with this hobby and to not be afraid of taking on what may seem like a piece of junk!

Thanks for stopping by my blog.  Please feel free to post comments, good or bad, and be sure to come back and check for future posts.

Saturday, July 6, 2013

Testing to the rescue

Some times stuff happens and you don't really know why.  This is why you need test equipment.

This was the case with my Dad's new 3D plane.  This was a kit that came without any electronics but had recommendations.  Since it was from Hobby King, of course the recommendations were for their parts.  No big deal, I actually like most of their parts.  I helped my Dad figure out what he needed and what was the best fit of parts from the US warehouse.  When he got everything together he noticed that things were getting hot.  Not a good sign.

He had a good idea of how to put a heat sink on his speed controller, since this is what was getting hot, and I helped him figure out the best way to put it on.  What he did was to use some heat sink compound in the center and then some epoxy on the corners to secure it down.  This was of course after cutting away some of the heat shrink to expose the ESC aluminum heat sink.  This is what he ended up with.


Darn good job, don't you think?


This is the other side showing that it is a Hobby King brand 25A (30A burst) variety.  This should already be a pretty good ESC and with the added heat sink, even better.  The velcro in the photo was something he added to help keep the ESC tacked down in his plane (nice idea).

After some testing, it was still getting really hot, too hot to touch and would actually go into shutdown mode!  This already happened once while he was test flying it.  We initially thought he had lost control when it went behind an obstruction, but we no longer think this was the case.

So, now to the testing and test equipment.  I was able to come down with the family and my gear (yes, family comes first. Since there was still some space left in the trunk I could take my gear along!).  We hooked up my power meter in between the battery and the ESC and began testing it out.


We found that at full throttle it was only pulling 14A.  This is well below the rating of 25A, but it was roasting hot after only about 30 seconds.  It even when into shutdown mode about 20 seconds later.  Even with the added heat sink, it was too hot to touch!

We then tested the power draw on my Wild Hawk which I upgraded to a brushless motor with a Turnigy 25A ESC.  This combination drew slightly more current at about 16A, but stayed quite cool and was barely warm after a minute or so of wide open throttle. 

So, this resolved why he lost control.  This also suggests that two other possibilities.  One is that the Hobby King brand parts (or ESC in this case) are not very good, or the other possibility is that they had a batch of much lower rated ESCs go out with the wrong labels on.  We would not have known this without the tester as we would not have been able see that the current draw was well below the rating.

Well, what does he do now?  He has two options.  One is to pursue a replacement from Hobby King and the other is to just go out and buy a more reliable brand.  Since the Hobby King ESC was only about $7, I think he will just look for a better replacement.

Thanks for stopping by my blog.  Please feel free to post comments, good or bad, and be sure to come back and check for future posts.

Saturday, June 29, 2013

Can't get enough test equipment

After a long hiatus, I am finally submitting a new post.

Since my last post I have learned a lot about RC equipment and testing.  This has led me to realize that I need another servo tester, or power analyzer.  This one does not control the server under test, but reports on the servo voltage and current use.  This is very important in making sure that servos are up to the task at hand and that the battery or BEC circuit is capable as well.

You may have seen one of my previous posts about my big T28 Trojan and my crash.  I suspected that this crash was due to power issues but have had no way to test this.  With this servo power analyzer I will be able to find out what is going on with the servo/receiver power system.

What is needed for this tester is a way to measure amps and voltage used by a servo, and all the way up to all servos including the receiver.

These are the parts that will be used build my servo power analyzer.


The parts consist of an amp meter, volt meter, project box, small circuit board, connector pins, and some connector lugs.  Also needed but not shown is some wire to make all of the connections.


This is a closer view of the Amp and Volt meters I used.  The Amp meter is rated at 5A max and the Volt meter has a rating of 10 volts.  Most of these testers that I have seen are setup for 500mA and 6 volts.  I chose these values so that I could monitor a larger range of current and voltage.


Another view of the inexpensive (about $6 each including shipping!) meters I bought on eBay.  These are inexpensive, but they'll do just fine.


This is a better view of how the circuit board and pins will be used.  The pins can be snapped off in the number needed.  Since these will be used for servo connections, these will be broken off in 3s.  The circuit board will be cut in half and one half used for each end.


This is how the completed tester looks with the two meters mounted on the face.  The connectors are on each end.


These are the pins for the output or servo side.  I opted to provide two connectors here so I could hook up two servos at a time.  I could also use a splitter cable as well but this was easy enough to add.


This is the input side (sorry for the blurry photo).  There is no need for more than one input here.


This shows a typical setup for testing a servo.  With this setup I can monitor any voltage and current fluctuations while the servo is put through its paces.

The way I plan on using this to test my T28 setup, is to plug the BEC into the input side and the receiver with all of the servo connections into the output side.  Then I will monitor for voltage fluctuations (anything dropping much below 6V) and maximum amp flow.  Anything above the amp rating of the BEC will be a sign that it is not up to the task or I have a problem with a servo or two.

I realize that I did not include a circuit diagram and this would be very helpful for anyone wanting to make one of these.  It's really very basic and should be easy to duplicate.  So, here it is:


The positive voltage path flows through the Amp meter.  The voltage is measured the positive and negative voltage paths.  The servo signal wire passes straight through without interruption.

Thanks for stopping by my blog.  Please feel free to post comments, good or bad, and be sure to come back and check for future posts.

Saturday, October 20, 2012

Battery of Confusion

I hear a lot of people making comments about batteries that tells me they are confused over how batteries fit into their electric airplane power system.  I decided to do this blog entry to try to clear up some of this confusion without adding any more to the subject.

I hope to clear things up by relating an electrical system to an internal combustion system.

In a simplified internal combustion system the gas tank stores energy (in the form of gasoline), a carburetor controls the flow of energy to the motor, and the motor converts the energy into mechanical motion.

In our electric airplane power systems, the battery stores the energy (electricity), a speed controller feeds that energy to the electric motor, and the motor converts the energy into mechanical motion.

The battery as two parameters that it is rated by, the voltage and milliamp hours.  The milliamp hours is a rating of its capacity, just like a gas tank capacity might be rated in gallons.  A higher number of gallons does not make a car go any faster, it only allows the car to run longer.  The same is true for batteries.  A larger milliamp hour rating will not make your plane fly any faster, only run longer.  There is another little mix to this in that the milliamp rating (multiplied with the "C" rating) is related to the flow rate.  This is similar to a gas tank with either a low or high capacity fuel pump and line.  If an internal combustion engine requires more fuel than than the fuel pump and line can supply, its power and performance will suffer.  So too, if an electric motor demands more current (milliamps) than the battery can supply, the battery voltage will drop along with the electric motor power and performance.

The voltage rating is a little different and is more closely related to the octane rating of gas.  If I have a high performance car motor and run regular gas in it, I can only expect so much performance.  The fuel mixture is only capable of creating an explosion of so much to push the pistons down.  Now if I put high octane racing fuel in the tank, I can expect much more performance.  This fuel mixture is capable of a much greater explosion to push the pistons down.  A low voltage battery can only give its rated voltage to the electro-magnets that repel the permanent magnets.  A higher voltage rated battery will allow for a larger repelling force.

Now, keep in mind, just as the internal combustion race motor is built to take greater stresses, if a batteries voltage is increased, the speed controller and electric motor must be built to take on the extra stress.

I hope this analogy will help those out there that have been confused about batteries and their voltage and milliamp ratings.

Thanks for stopping by my blog.  Please feel free to post comments, good or bad, and be sure to come back and check for future posts.

Tuesday, October 16, 2012

Wild Hawk Flying Fun

This post will be a double post as this post will serve both my Wild Hawk blog and RC Flying Fun blog.  How you ask?  Well, I found a new place to fly and I flew my Wild Hawk for my first outing at this location.  This is also the first time flying for me in several months.  Wow, a person can sure get rusty!  This new location is on a road stub near an abandoned mall construction site.  This road stub is off of the main road and across from the abandoned mall.  It is also surrounded by farm land used for growing hay.  There is a small group of flyers that get together each Sunday at this location.  One of the best features of this location is that it is only about ten minutes from my house.
why did I pick a place like this instead of a formal club with a real runway and amenities.  Well, I already joined the AMA (I recommend this membership for everyone in this hobby) and money is really tight right now (you folks with kids in college know what I'm talking about).  So funding my hobby and paying club dues and AMA dues is out of the question.  This site fits my budget and still gives me a good group to associate with.
Any way, here are some photos of this location including pictures of my Wild Hawk airplane getting ready to fly.


I did have an accident and crashed hard after failing on an outside loop.


It looked bad but I was up and flying again after some minor repairs and a battery swap.

I flew all three of my batteries this day.  The only unfortunate thing was that on this day there were no other flyers that showed up.  I had a good time anyway and could fly and land anywhere I pleased.

Before publishing this post I got a chance to fly again and made a video from one of my flights.  Enjoy this areal look around.

Thanks for stopping by my blog.  Please feel free to post comments, good or bad, and be sure to come back and check for future posts.

Tuesday, April 17, 2012

Airfield T28 Trojan Maiden Flight

I have this beautiful new new Airfield T28 Trojan and I finally have a chance for it's maiden flight!

I feel that I should note here, before I go on, that I have discovered that the Airfield name is actually a re-brand by Nitro Planes of FMS products.  Not that that's a bad thing, just that FMS T28 enthusiasts are included too!

Its Easter weekend and I will be visiting my folks near that cool park and the weather is expected to be great for flying.

Look at all those wires
We start packing for our trip and I realize that this plane is huge and would not fit in the trunk of my car (Mazda 3).  It wouldn't be so bad, but this plane is not made to be taken apart like most planes.  There are four screws that bolt the wings on from underneath.  This isn't so bad except that there are a million wires that come from the wings into the fuselage!  OK, OK, there are 5 sets of wires from one wing and 6 from the other (landing gear door, landing gear, flaps, ailerons, and wing lights) and not a million.  These are routed through small openings that make dis-assembly/assembly difficult and something to be avoided at all costs!  OK, I'm being dramatic again, but this is not trivial.  As it would happen, I did end up unbolting the wings, separating them, and disconnecting all of the connections for the servos and lights to get this big plane to fit.

Wow, this really made me think that I need to take transportation into account with planes in the future, and explains why serious RC pilots have trailers.

Once we arrived (we were early for once) I unloaded the plane into my Dad's workshop and started assembly.  Of course this was not until after we greeted them, brought in our dinner contribution, gifts for recent birthdays, and visited a little.  I'm not that crazy focused on RC planes.  Now I only had to wait for the meal to be over and for all of the other guests to leave!  I have to say that I did not really want that meal to be over because my Mom made this lamb that was to die for (hm... not sure that was worded appropriately).  Any way, it was really good.

Hooking up the battery
Snapping on the cockpit
Testing the throttle
Finally everyone is gone and I still have 45 minutes before we also need to leave.  Off to the park.  We arrive at the park.  I have to thank my daughter who rode in the back seat with the airplane tail in her face (I also have to thank her for being my photographer).  There is about a 5mph breeze, but this shouldn't be an issue.  We get the plane out and I get it setup.  Wow, it sure looks good sitting out there on the dirt runway!  I tested all of the control surfaces, I tested the motor, and then I taxied the big Trojan T28 out and around the runway.  I let her sit there for a bit off to my left facing into the breeze, giving me time to collect my courage.


Ready for take off
Leaping into the sky
I gave her full throttle and hoped to keep her straight.  Half way down I could see her wanting to take flight.  I gave her a little elevator and she shot straight up into the air.  Wow, beautiful!  I struggled to level her out and bring her around as the controls are a lot touchier that I'm used to.  Watch out, this thing can really snap around!  I eased up on the throttle and  pulled in the landing gear as I made a big loop around the airfield in front of me.  I'm just now thinking that I should start working with the trim.  I go for another loop but this time decide to try turning away from myself as I'm coming across the back field.  At this point she is downwind and about 100 yards off to my right at about a 45 degrees.

It hit about 10ft back
Dad and I assessing the damage
This is where things go terribly wrong as suddenly I feel that I have no control!  I had given more power, but she is not going any faster!  I gave her up elevator, and she is not climbing!  I gave her left and right aileron and she is not banking!  The next thing I know is that my beautiful $280 Trojan T28 is headed straight for the ground!  At the last moment she started to respond the my elevator command and pulled up just enough to avoid drilling in!  Pieces flew just before that terrible WHUMP sound reached us.  Nothing left to do but start that dreaded walk over to see what was left.

Still assessing the damage
Point of impact
Small pieces everywhere but the fuselage was intact!  So, this was bad, but not as bad as I anticipated.  We collected all the parts putting them in a bag.  Took the wing apart again and loaded it up, in the trunk this time.  No need for careful placement and handling.

Next post I hope to feel well enough to review the extent of the damages and reconstruction.

Thanks for stopping by my blog.  Please feel free to post comments, good or bad, and be sure to come back and check for future posts.

Thursday, April 5, 2012

Happy Birthday To Me!

So not enough candles.
So, it's my birthday (well a few days ago) and it was a big one, and my wife, the understanding and sweet wife she is, said that I should order the RC airplane I've been wanting for some time!  Now I've been pining for one of these since I first saw one over a year ago.  The plane I saw was a T28 Trojan (Parkzone).  I just loved the look and size of that plane.  And now, my wife was telling me to go buy one! Woo whoo!

On Sunday, I started reviewing all of my options for a T28.  First off I have to say that I was not interested in the small versions (800mm).  I wanted a big one!  After reviewing the Durafly (1100mm and retracts), Parkzone (1120mm), Dynam (1270mm and retracts), and Airfield (1400mm and retracts) models, I chose the big one, the Airfield, from Nitro planes.  Now it was by far the most expensive (about $280 including shipping), but aside from being the biggest, it had the coolest features.  These include lights, sequenced landing gear and doors, flaps, cowl flaps, and a 2.4GHz 6 channel transmitter!

Now I'm really excitted!

Was hoping there would be a big
picture of it on the box.  Oh well.
On Monday, I signed up for an account and ordered my birthday present.  By the end of the day, my order was processed and ready for shipping.  By Wednesday, it was on my doorstep!  Granted it only had to go from LA to Sacramento (both in California), but still, I only selected the base UPS ground shipping.


With the top off
All of the big parts laid out
Nice battery even if the charge cable
is a little short.
Now I did order the RTF version (mostly because they were back ordered on the ARF), but it is anything but RTF.  After about 2 hours I had it together with the glue drying (rudder and elevator need to be glued together) and all of the servo connection hooked up.  I guess the RTF part is that I had everything to fly, including the battery and radio.  I only needed to assemble it and charge the battery.  This thing is a monster!
The beast, all put together.


Now I'm all ready to fly and waiting for good weather.

Soon I'll have an update on how it flies and hopefully not one on how it crashes.

Thanks for stopping by my blog.  Please feel free to post comments, good or bad, and be sure to come back and check for future posts.